Installation#
Broadly speaking, the following steps are required to get DySTrack running:
Installing software dependencies
Installing the DySTrack python package
Setting up the microscope macro / automation workflow
Installation can be tricky…
Installing DySTrack is more complicated than simply using it.
Before jumping in, be sure to familiarize yourself with how DyStrack works in general and how to use it on your particular microscope.
The person(s) performing the installation should be well-versed with the microscope in question and ideally have some experience with python and computers in general (though basic knowledge should be sufficient). It can be useful for more than one person to work together, for example a user and a member of a microscope facility team.
Also, do plan in ample time (at least a half-day) to go through all steps carefully and to debug any problems that crop up along the way. Since operating systems, microscope setups, and software versions all change frequently, there are many moving parts that may give rise to unexpected roadblocks.
If we might have missed something in our documentation or if something seems out of date, we welcome questions and (constructive) feedback; please raise an Issue on GitHub. (Alas, we cannot guarantee that we will be able to solve your problem or address your feedback.)
Supported configurations
Currently, DySTrack provides out-of-the-box support for microscopes running
ZEN Black via MyPiC (tested on Zeiss LSM880), ZEN Blue via
Macros (Zeiss LSM980), or NIS Elements via JOBS (Nikon AXR).
Adaptation to any other microscope control software that supports basic macros/automation is also possible but requires extra work (see here), and support for other systems may be added in the future.
The microscope PC’s Operating System must be Windows 10 or 11.
Risk of damage
Modern microscopes are expensive machines, and automating them comes with an inherent risk of damage.
Do not install DySTrack without permission from the microscope’s administrator!
Also, be sure to test the installed setup carefully, and always ask for help if you are unsure about something!
Part 1: Installing software dependencies#
The DySTrack manager and pipelines are written in python and shared via GitHub, so you need to first install python and git (git is optional but recommended).
If you are familiar with a particular python distribution, feel free to use it.
We recommend Miniforge for environment/package management using conda,
and we will be using it here in the documentation to explain how to install
DySTrack. To use Miniforge, download the Miniforge Installer here and then
follow its instructions to install it.
The DySTrack library can be installed via pip directly from PyPI. However, since it is likely that some degree of coding (e.g. addition or modification of an image analysis pipeline) will be required to adapt DySTrack to your particular experiment of interest, we recommend using git to clone and manage the source code repository. You can download the Git for Windows Installer here and follow its instructions to install it.
Part 2: Installing the DySTrack python package#
As mentioned above, we recommend installing DySTrack and its python dependencies from the GitHub source code. The following steps explain how to do this. If you instead prefer to install via pip from PyPI, skip these steps and find the relevant note (blue box) at the end of this section.
2.1: Cloning the GitHub repository#
(Optionally, first create your own GitHub fork of the DySTrack Github repo. This is recommended if you plan to contribute improvements to DySTrack. If you don’t know what this means, you can skip it.)
Use git to clone the DySTrack repository (or your fork of it) to a local folder on the microscope PC:
In Git Bash:
git clone https://github.com/WhoIsJack/DySTrack.git
2.2: Creating a python environment for DySTrack#
Using your preferred python environment/package manager, create a new
environment for DySTrack with a supported version of python (>=3.10, <3.14)
and pip (installed automatically if using conda create).
In a Miniforge prompt:
conda create -n dystrack python=3.13
Next, ensure your environment is active:
conda activate dystrack
2.3: Installing DySTrack into the environment#
With the dystrack conda environment active, use cd to change directory into
the DySTrack git repository folder cloned during step 2.1. Then use pip to
install DySTrack and its python dependencies:
pip install -e ".[full]"
This results in an “editable” install, where changes to the source code (e.g.
adding a new pipline) will be applied immediately. There is no need to
reinstall unless changes are made to the project metadata (e.g. addition of
dependencies to pyproject.toml)
Side note: Expert users may choose not to do a “full” install (see pyproject.toml for specs), but we always recommend “full”.
Once the installation is complete, we strongly recommend running the DySTrack test suite to check that everything is working as intended. With the environment still active and the working directory still being the DySTrack repo folder, you should be able to run the tests with this simple command:
pytest
Installation from PyPI
If you have just installed DySTrack by going through the steps above (recommended), please skip this.
If you instead want to install DySTrack from PyPI, first go back and complete step 2.2 to create and activate a new conda environment for DySTrack.
With the new environment active, you can install from PyPI:
pip install "dystrack[full]"
DySTrack in Jupyter notebook
If you would like to use DySTrack from Jupyter notebook (not normally recommended, but it is an option), we recommend installing Jupyter notebook in your base conda environment:
conda deactivate dystrack
conda install notebook=6
Then add your DySTrack environment as a kernel:
conda activate dystrack
python -m ipykernel install --user --name=dystrack
And launch Jupyter notebook from the base env:
conda deactivate dystrack
jupyter notebook
Installing DySTrack without an internet connection
Some microscope PCs do not have a connection to the internet, but DySTrack can still be installed using similar steps.
First, on a PC that has an internet connection, clone DySTrack and install
it as described in the steps above. Then make a new folder called
dependencies inside the DySTrack folder and use pip to add all
required dependencies into that subfolder:
conda activate dystrack
pip download -d dependencies ".[full]"
Pip should now package the dependencies into .whl files in the
dependencies folder. Note that you may need to provide additional
options to ensure compatibility if your online PC is not the same OS as
your target offline PC.
Now transfer the entire DySTrack folder (including dependencies) as
well as the installers for Git for Windows and Miniforge to the PC that
does not have internet access.
Repeat the installation process on that PC, but when you get to the
pip install command, use the following command instead of the normal
one:
pip install --no-index --find-links dependencies -e ".[full]"
Run pytest as usual to check if everything is working.
You may also wish to build a local copy of the docs so you can view them without an internet connection. Once everything is installed, run:
conda activate dystrack
cd docs
make html
You can now open the file docs/build/html/index.html in a web browser
to view the documentation locally. We recommend bookmarking the page in the
browser so you don’t need to go find the file each time.
Part 3: Setting up the microscope macro#
The microscope macro / automation workflow handles acquisition control and communicates with DySTrack from within the microscope’s native control software. Therefore, the steps here depend on the microscope/software that is being used.
Zeiss ZEN Blue with IronPython macro#
DySTrack uses a Zeiss OAD IronPython macro to interface with ZEN Blue.
No special installation should be required. Simply start ZEN Blue as usual and then open the Macro editor:
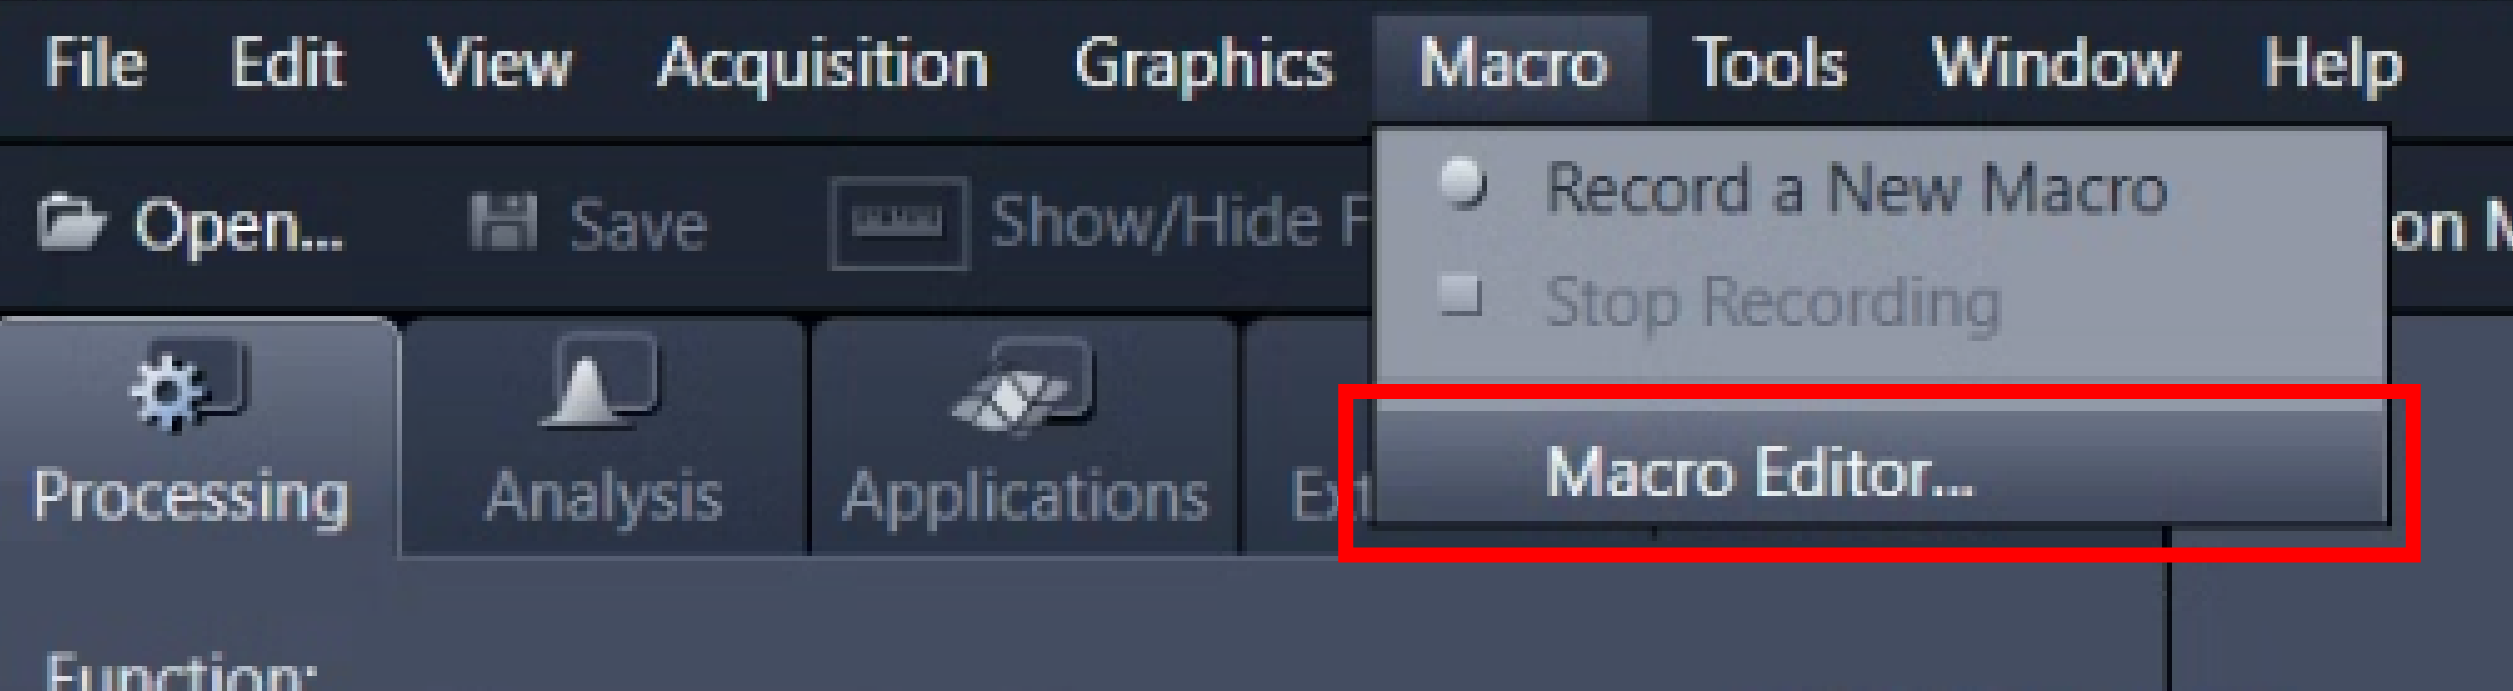
If this option is not available, speak to facility staff or get in touch with your Zeiss representative.
In the editor, find and open the DySTrack macro. It is located in the DySTrack
repository’s macros folder and called LSM980_ZENBlue_macro.py.
With this, DySTrack is now ready for use in ZEN Blue. Detailed usage instructions are found here.
Zeiss ZEN Black with MyPiC#
DySTrack uses the MyPiC VBA macro to interface with ZEN Black. You can find everything you need to install it in the GitHub repo, including installation instructions in the associated Wiki.
With MyPiC installed, DySTrack is now ready for use in ZEN Black. Detailed usage instructions are found here.
Nikon NIS-Elements with JOBS#
DySTrack uses the JOBS automation suite to interface with NIS-Elements.
Due to technical reasons, DySTrack JOBS Definitions also require a GA3 Script as a dependency.
Follow these steps to import the required GA3 Script:
Enter the
JOBS/GA3tab (at the top):
If this option is not available, speak to facility staff or get in touch with your Nikon representative.
Go to
Analysis Explorer(middle-left):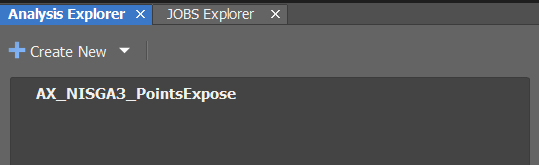
Create New >> Import Analysis From File...Import
DySTrack\macros\AX_NISGA3_PointsExpose_vX-XX-XX.ga3The
vX-XX-XXrelates to the version number of NIS Elements. You can find this inHelp >> About.... Use the GA3 file that matches your version number as best as possible, or simply try the latest version available.To test, double-click it and select the file
DySTrack\tests\testdata\test-pllp_AXR_prescan.tiffThe GA3 preview should run and display some numbers about the prescan file;
PrescanDimsin particular should have 8 columns (VolumeSizeX[um], etc.) with a single number in each.
Next, follow these steps to import DySTrack JOBS Definitions:
Go to the
JOBS Explorer(next to theAnalysis Explorer)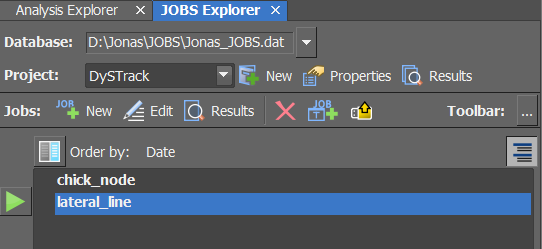
If necessary, create a new empty JOBS Database
If necessary, create a new Project (named e.g.
DySTrack)Find the
Import from Filebutton It’s a yellow folder icon with a yellow upwards arrow.Import the desired NISJOBS
.binfile(s) fromDySTrack\macrosCurrently, DySTrack offers two out-of-the-box JOBS Definitions (see below for more information). It may make sense at this point to just import both, so they are available and can be inspected as examples.
Again, there are version numbers
vX-XX-XXassociated with each JOBS file. Use the one that matches the GA3 file imported above.
You can now view and if necessary edit/customize a JOBS definition by double-clicking on it. We strongly recommend making a copy of an existing JOBS definition before trying out any modifications on it.
Common issues with GA3 and JOBS
The interplay of GA3 and JOBS can be rather fickle.
One common problem arises because GA3 files and sometimes JOBS files will
“pay attention” to open images and may (mal)adapt automatically to them. To
head this off, we recommend configuring example acquisition settings and
acquiring or reloading a prescan stack prior to opening GA3/JOBS scripts.
The file DySTrack\tests\testdata\test-pllp_AXR_prescan.tiff included in
the DySTrack repo should work for this.
Another common issue is that changes to the GA3 Script may trigger the JOBS script to automatically toggle some settings (and sometimes this seemingly happens for no reason whatsoever). To ensure everything is correct, there are two things to check in the JOBS block that uses the PointsExpose GA3 script:
In the
Save outputstab, check that the box underImages(usuallyEGFP, but this may change) is unticked and the box underTables(should bePrescanDims) is ticked.In the
Export parameterstab, check that bothTablesand its descendant,PrescanDims, are ticked.
If a problem persists that cannot easily be solved, it may be necessary to speak to your Nikon rep.
Out-of-the-box JOBS Definitions
The DySTrack repo comes with two pre-built JOBS Definitions in the
macros folder:
AX_NISJOBS_lateral_line_vX-XX-XX.bin
This definition is used for standard tracking tasks, optionally with multi- positioning for multiple samples. It should work for most simple experiments and should be the starting point for any customized workflows.
AX_NISJOBS_chick_node_vX-XX-XX.bin
This definition was implemented for a special case where the main scan is itself a tile scan. Here, a single field of view is acquired as the prescan (e.g. the chick node), but the subsequent main scan is a tile scan that covers a wider area (e.g. somitogenesis anterior of the node). This is an example of a slightly more advanced setup.
With the GA3 dependency and the DySTrack JOBS available, DyStrack is now ready for use in NIS-Elements. Detailed usage instructions are found here.
Other microscopes#
Currently, DySTrack only works “out of the box” on microscopes controlled with one of the applications listed above.
Detailed guidance on how to implement a new macro / automation workflow to support another system is provided here, but note that this will require more time and expertise than is needed to install and use DySTrack on an officially supported system.
We plan to add official support for other microscopes in the future.